学习目标
- 理解WebFlux核心组件HttpHandler、WebHandler的创建过程
- 理解DispatcherHandler如何映射请求url及参数的过程
- 理解Netty服务的主要启动节点
此次学习的Spring boot版本为2.6.6,对应的Spring webflux版本为5.3.18
入口
Springboot工程入口方法为 SpringApplication.run() ,从此方法开始进行分析。
public static void main(String[] args) {
    SpringApplication.run(Main.class, args);
}
决定启动的web应用类型
整个服务的web应用类型是在构造 SpringApplication 类时进行确定的,具体代码如下:
this.webApplicationType = WebApplicationType.deduceFromClasspath();
判断应用类型的逻辑
- org.springframework.web.reactive.DispatcherHandler存在
- org.springframework.web.servlet.DispatcherServlet不存在
- org.glassfish.jersey.servlet.ServletContainer不存在
即确认webApplicationType为 Reactive
if (ClassUtils.isPresent(WEBFLUX_INDICATOR_CLASS, null) && !ClassUtils.isPresent(WEBMVC_INDICATOR_CLASS, null)
    && !ClassUtils.isPresent(JERSEY_INDICATOR_CLASS, null)) {
    return WebApplicationType.REACTIVE;
}
创建具体的ApplicationContext
根据webApplicationType(Reactive)确定创建的ApplicationContext为AnnotationConfigReactiveWebServerApplicationContext,此Context支持 @Component 和 JSR-330规范中 @Inject 形式的依赖注解
SpringAplication.createApplicationContext()
switch (webApplicationType) {
case SERVLET:
    return new AnnotationConfigServletWebServerApplicationContext();
case REACTIVE:
    return new AnnotationConfigReactiveWebServerApplicationContext();
default:
    return new AnnotationConfigApplicationContext();
}
最主要的ApplicationContext.refresh()方法
refresh的Refresh阶段
刷新操作是在 AbstractApplicationContext 类的refresh方法中进行,在调用invokeBeanFactoryPostProcessors方法时会有对controller注解的扫描与处理
扫描Controller注解
ConfigurationClassPostProcessor.processConfigBeanDefinitions() 对Bean定义进行处理,此次研究只关注controller的处理, 具体的处理逻辑在 AbstractHandlerMethodMapping.initHandlerMethods() 方法中,最终调用的是 detectHandlerMethods() 方法,后续进行Handler方法的注册
if (beanType != null && isHandler(beanType)) {
    detectHandlerMethods(beanName);
}
Controller方法支持的条件
- patternsCondition
- methodsCondition
- paramsCondition
- headersCondition
- consumesCondition
- producesCondition
- customConditionHolder
注册Handler方法
AbstractHandlerMethodMapping调用MappingRegistry.register()进行Handler注册
private final MappingRegistry mappingRegistry = new MappingRegistry();

protected void registerHandlerMethod(Object handler, Method method, T mapping) {
    this.mappingRegistry.register(mapping, handler, method);
}
refresh的onRefresh阶段
createWebServer
在onRefresh阶段, AnnotationConfigReactiveWebServerApplicationContext的父类ReactiveWebServerApplicationContext进行了webServer的创建
@Override
protected void onRefresh() {
    super.onRefresh();
    try {
        createWebServer();
    }
    catch (Throwable ex) {
        throw new ApplicationContextException("Unable to start reactive web server", ex);
    }
}
- 创建webServer具体由WebServerManager类处理,WebServerManager中创建的httpHandler是Delayed,也就是延迟初始化的
获取BeanFactory
ReactiveWebServerFactory webServerFactory = getWebServerFactory(webServerFactoryBeanName);获取到的Factory为 NettyReactiveWebServerFactory
创建HttpServer
主要逻辑在NettyReactiveWebServerFactory->getWebServer()方法中,在createHttpServer中看到了 HttpServer server = HttpServer.create();
@Override
public WebServer getWebServer(HttpHandler httpHandler) {
    HttpServer httpServer = createHttpServer();
    ReactorHttpHandlerAdapter handlerAdapter = new ReactorHttpHandlerAdapter(httpHandler);
    NettyWebServer webServer = createNettyWebServer(httpServer, handlerAdapter, this.lifecycleTimeout,
                                                    getShutdown());
    webServer.setRouteProviders(this.routeProviders);
    return webServer;
}

private HttpServer createHttpServer() {
    HttpServer server = HttpServer.create();
    if (this.resourceFactory != null) {
        LoopResources resources = this.resourceFactory.getLoopResources();
        Assert.notNull(resources, "No LoopResources: is ReactorResourceFactory not initialized yet?");
        server = server.runOn(resources).bindAddress(this::getListenAddress);
    }
    else {
        server = server.bindAddress(this::getListenAddress);
    }
    if (getSsl() != null && getSsl().isEnabled()) {
        server = customizeSslConfiguration(server);
    }
    if (getCompression() != null && getCompression().getEnabled()) {
        CompressionCustomizer compressionCustomizer = new CompressionCustomizer(getCompression());
        server = compressionCustomizer.apply(server);
    }
    server = server.protocol(listProtocols()).forwarded(this.useForwardHeaders);
    return applyCustomizers(server);
}
refresh的finishBeanFactoryInitialization阶段
设置DispatcherHandler
初始化WebHandler,也就是DispatcherHandler,因为DispatcherHandler实现了ApplicationContextAware接口,在加载Spring配置时,setApplicationContext方法会被调用,setApplicationContext主要做了统一分发策略的处理
- SimpleUrlHandlerMapping主要使用的handleMapping
- handlerAdapters
- resultHandlers
构建HttpHandler
HttpHandlerAutoConfiguration自动装配,调用WebHttpHandlerBuilder.applicationContext(this.applicationContext).build()构建真正的 HttpHandler
@Bean
public HttpHandler httpHandler(ObjectProvider<WebFluxProperties> propsProvider) {
    HttpHandler httpHandler = WebHttpHandlerBuilder.applicationContext(this.applicationContext).build();
    WebFluxProperties properties = propsProvider.getIfAvailable();
    if (properties != null && StringUtils.hasText(properties.getBasePath())) {
        Map<String, HttpHandler> handlersMap = Collections.singletonMap(properties.getBasePath(), httpHandler);
        return new ContextPathCompositeHandler(handlersMap);
    }
    return httpHandler;
}
WebHttpHandlerBuilder.applicationContext()
Builder的通过context进行HttpHandler字段信息构建,主要包含以下字段信息
- webFilters 服务使用的过滤器
- exceptionHandlers 异常处理器
- sessionManager 会话管理器
- codecConfigurer 编解码配置
FilterChain的构建
WebHttpHandlerBuilder.build() 方法调用 new FilteringWebHandler方法进行DefaultWebFilterChain的创建,构建的FilterChain主要是用来对请求Filter的链式操作
public FilteringWebHandler(WebHandler handler, List<WebFilter> filters) {
    super(handler);
    this.chain = new DefaultWebFilterChain(handler, filters);
}
refresh的finishRefresh阶段
启动Server
终于看到服务的启动了,在调用链路 finishRefresh->getLifecycleProcessor().onRefresh()->DefaultLifecycleProcessor.startBeans()->doStart()
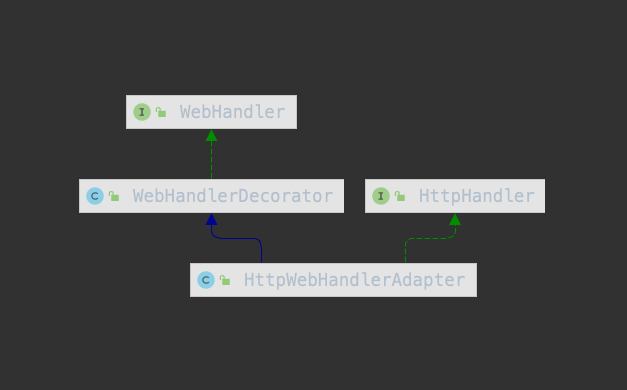
- initializeHandler初始化Handler为 HttpWebHandlerAdapter(WebHandler到HttpHandler的适配器)
- NettyWebServer.startHttpServer()
@Override
public void start() {
    this.weServerManager.start();
    this.running = true;
}
HttpWebHandlerAdapter
至此,服务准备就绪。